


💡 What is Software Testing?

Software testing is the process of assessing and confirming that a software application or product performs as intended. Testing has advantages such as bug prevention, lower development costs, and better performance.
As software developers, it is critical to lower the chances of our program failing by running tests with the end-user in mind and testing your application the same way they would use it.
🤔 Why should you write tests?
- Guaranteed good test coverage.
- Reduced maintenance and software support costs.
- Reusable test cases.
- Confirmation that the software satisfies end-user requirements.
- Improved quality of software and user experience.
- Higher quality products lead to more satisfied customers.
- More satisfied customers will increase company profits.
🤖 Automated Testing
Automated Testing is performed by a machine that executes a previously prepared test script, written in advance. These tests can range in complexity from examining a single method in a class to verifying that carrying out a series of intricate UI actions yields the same outcomes. It is considerably more robust and trustworthy than manual tests.
🖥 Types Of Testing
1) Unit Testing
Unit tests are pretty basic and carried out near an application's source code. They entail testing each class, component, or module used by your software's distinct methods and functions. A continuous integration server may perform unit tests very quickly and at a relatively low cost.
2) Integration Testing
Integrity testing ensures that your application's various components or services function properly. For instance, it could involve testing database interactions or providing that microservices interact as intended. These tests cost extra to conduct since several different components of the application must be operational.
3) Functional Testing
The business requirements of an application are the main focus of Functional Testing. They don't check the system's intermediate states while acting; they only check the action's outcome.
Because both require several components to interact with one another, integration tests and functional tests are occasionally confused. A functional test would anticipate obtaining a certain value from the database by the product requirements, but an integration test may only check that you can query the database.
4) End-to-end Testing (E2E)
End-to-end testing simulates user behavior using the software in the whole context of an application. It checks that different user flows function as intended and can be as straightforward as loading a webpage or login in or somewhat more complicated scenarios checking email notifications, online payments, etc.
End-to-end tests are tremendously helpful, but they are expensive to run and if automated, can be challenging to manage. To be able to quickly discover breaking changes, it is advised to have a limited number of important end-to-end tests and to rely more on lower-level testing (unit and integration tests).
5) Validation Testing
Acceptance Testing is official testing that determines whether a system complies with business needs. They concentrate on reproducing user actions while executing the complete application during testing. They can, however, take a step further and assess the system's effectiveness, rejecting improvements if particular objectives are not achieved.
6) Performance Testing
Performance Testing assesses a system's ability to handle a specific workload. These evaluations aid in determining an application's dependability, speed, scalability, and responsiveness. For instance, a performance test can monitor response times when a large number of requests are being processed or can assess how a system responds to a sizable amount of data. It may assess whether a program satisfies performance standards, find bottlenecks, gauge stability during high traffic, and do much more.
7) Smok Testing
Smoke Testing is a simple test that examines an application's fundamental operation. They are designed to be quickly carried out, and their purpose is to provide you with the confidence that the main system components are functioning as planned.
Smoke tests can be helpful immediately following the creation of a new build to determine whether or not more expensive tests can be run, or immediately following a deployment to ensure that the application is functioning properly in the newly deployed environment.
🧪 Test-Driven Development (TDD)
In Test Driven Development, test cases rather than the code that verifies them are written first. It relies on repeating a quick development cycle. It uses automated unit tests to direct design and unrestricted decoupling of dependencies.
The motto of TDD:
- Red: Create a test case and make it fail
- Green: Make the test case pass by any means.
- Refactor: Change the code to remove duplicate/redundancy.
When using TDD, it is recommended to write tests before writing a function itself.

⚙ Basic setup
Let's first create a React App with TypeScript.
npx create-react-app jest-example --template typescript
Now if you open your package.json you can find jest-dom and testing-library/react are already installed as a dependency.
jest-dom: This library provides a set of custom jest matches that you can use to extend jest. These will make your tests more declarative, and clear to read and maintain.testing-library/react: This is a testing utility tool that's built to test the actual DOM tree rendered by React on the browser. The goal of the library is to help you write tests that resemble how a user would use your application.
The src directory contains all the app code and a file called App.test.tsx. This file contains a test that makes sure that the App component renders a link. Now, let's break it down and see what the code is.
import React from 'react';
import { render, screen } from '@testing-library/react';
import App from './App';

// We outline the objectives of the test.:
test('renders learn react link', () => {
  // Arrange: We get ready the testing environment, and rendering of the component;
  render(<App />);

  // Act: Look for the anticipated link.
  const linkElement = screen.getByText(/learn react/i);

  // Assert: check that the document contains the necessary link.
  expect(linkElement).toBeInTheDocument();
});
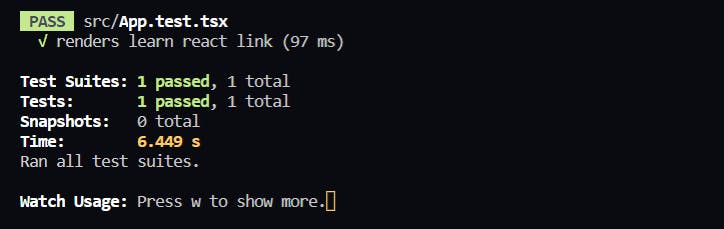
Now run the following command to run tests:
npm run test
Result:
Now let's make some changes to App.tsx and fail the test results. Go to the App.tsx file and change "Learn React" to "Let's Learn". Here is the result:

This is so because there isn't an element on the DOM containing the string "learn react." The test will succeed once again if you add a new element with the text "learn react."
✍ Writing your first Test
Now let's go to App.tsx and add a new function:
export function add(a: number, b: number): number {
  return (a + b);
}
Now let's go to App.text.tsx and write a new test:
describe('add function', () => {
  describe('when given to integers', () => {
    it("should return a add result", () => {
      // Arrange: Prepare the expected add result and the function arguments.
      // In this example 5 + 8 === 13:
      const [a, b, expected] = [5, 8, 13];

      // Here, we assign "a === 5," "b === 8," and "expected === 13" using array destructuring.

      // Act: To obtain a true function result, utilise the "add" function.
      const result = add(a, b);

      // Assert: Now a function's output is compared to the expected result.
      expect(result).toEqual(expected);
    });
  })
})
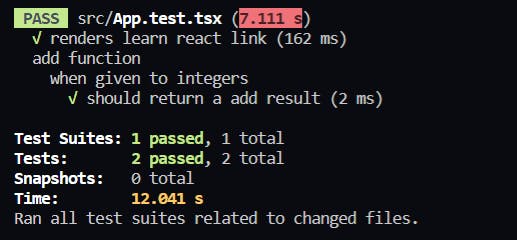
Now when you will run the test you will see this result:
🛠 Now let's test some components
Now it's time to test some components. Let's make another function in App.tsx.
export function Login() {
  return (
    <div>

      <div>
        <input type="email" name="email" placeholder="email"/>
      </div>
      <div>
        <input type="password" name="password" placeholder="password"/>
      </div>

      <div>
        <button type="button">Sign In</button>
        <button type="button">Sign Up</button>
      </div>

    </div>
  )
}
Now let's go to App.test.tsx and write the test case for this component.
describe('Login component tests', () => {
  let container: HTMLDivElement

  // beforeEach: Runs a function before each of the tests in this file runs. If the function returns a promise or is a generator, Jest waits for that promise to resolve before running the test.
  beforeEach(() => {
    container = document.createElement('div');
    document.body.appendChild(container);
    ReactDOM.render(<Login />, container);
  })

  // to clear everything at the end so that tests don't interrupt each other
  afterEach(() => {
    document.body.removeChild(container);
    container.remove();
  })

  // Running test to render each input field
  it('Renders all input fields correctly', () => {
    // Selecting the input fields
    const inputs = container.querySelectorAll('input');
    // Asserting that the input fields are rendered correctly
    expect(inputs).toHaveLength(2);

    // Let's check the first and second input field with the name "email" and "password" respectively
    expect(inputs[0].name).toBe('email');
    expect(inputs[1].name).toBe('password');
  });

  // Running test to render each button
  it('Renders all buttons correctly', () => {
    const buttons = container.querySelectorAll('button');
    expect(buttons).toHaveLength(2);

    expect(buttons[0].type).toBe('button');
    expect(buttons[1].type).toBe('button');
  });

})
Complete code:
import React from 'react';
import { render, screen } from '@testing-library/react';
import App, { add, Login } from './App';
import * as ReactDOM from 'react-dom';

// We outline the objectives of the test.:
test('renders learn react link', () => {
  // Arrange: We get ready the testing environment, and rendering the component;
  render(<App />);

  // Act: Look for the anticipated link..
  const linkElement = screen.getByText(/learn react/i);

  // Assert: check that the document contains the necessary link.
  expect(linkElement).toBeInTheDocument();
});


describe('add function', () => {
  describe('when given to integers', () => {
    it("should return a add result", () => {
      // Arrange: Prepare the expected add result and the function arguments.
      // In this example 5 + 8 === 13:
      const [a, b, expected] = [5, 8, 13];

      // Here, we assign "a === 5," "b === 8," and "expected === 13" using array destructuring.

      // Act: To obtain a true function result, utilise the "add" function.
      const result = add(a, b);

      // Assert: Now a function's output is compared to the expected result.
      expect(result).toEqual(expected);
    });
  })
})

describe('Login component tests', () => {
  let container: HTMLDivElement

  // beforeEach: Runs a function before each of the tests in this file runs. If the function returns a promise or is a generator, Jest waits for that promise to resolve before running the test.
  beforeEach(() => {
    container = document.createElement('div');
    document.body.appendChild(container);
    ReactDOM.render(<Login />, container);
  })

  // to clear everything at the end so that tests don't interrupt each other
  afterEach(() => {
    document.body.removeChild(container);
    container.remove();
  })

  // Running test to render each input field
  it('Renders all input fields correctly', () => {
    // Selecting the input fields
    const inputs = container.querySelectorAll('input');
    // Asserting that the input fields are rendered correctly
    expect(inputs).toHaveLength(2);

    // Let's check the first and second input field with the name "email" and "password" respectively
    expect(inputs[0].name).toBe('email');
    expect(inputs[1].name).toBe('password');
  });

  // Running test to render each button
  it('Renders all buttons correctly', () => {
    const buttons = container.querySelectorAll('button');
    expect(buttons).toHaveLength(2);

    expect(buttons[0].type).toBe('button');
    expect(buttons[1].type).toBe('button');
  });

})
🥇 Final result
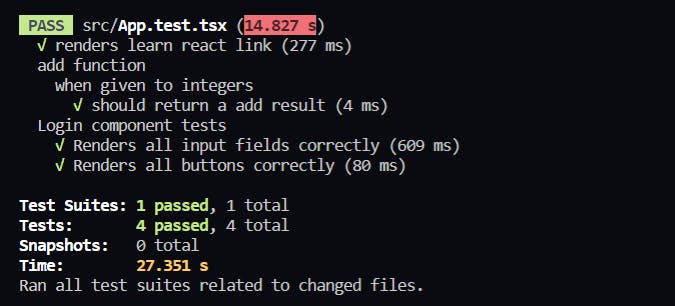

So now that all tests are passed, you can make more components and add more unit tests.
🤝 Conclusion
Testing your application, especially for large apps, is essential as it reduces maintenance and software support costs. In this blog, we see how to write unit tests with Jest, React, and TypeScript. You make more components and write more tests for them. You can find the complete source code on GitHub.

Thank you.